Nothing is more daunting to the uninitiated than the first Thanksgiving turkey. While I've posted my trials and test on best turkey technique previously (which you should read to fully understand what you are doing and why), I've still had many questions from those trying to follow my recommendations. So this year I'm doing a simple pictorial step-by-step guide. This surely will produce the best roasted turkey you've ever encountered.

- turkey, fresh preferred (15-20 pounds)
- brine mixture, or 20 ounces salt and 2 gallons of water
- brining bag or a large pot and possibly a cooler (see notes below)
- 2 large carrots, 2 celery stalks, 1 medium onion
- 1/2 pound (2 sticks) butter
- poultry seasonings
- salt and pepper
- 1 teaspoon Dijon mustard
- 2-3 tablespoons flour, for gravy
- roasting pan and roasting rack
- silicon oven mits
- gravy fat separator
- carving knife
- ingredients for dressing/stuffing (optional)
- ingredients for glaze (below and optional)
2 days ahead (Tuesday morning, for Thanksgiving Dinner)
Make the Brine (and defrost the turkey if using frozen)

You should make the brine ahead so it has to cool before use. You can use a package brine mix, or make your own. There are many good recipes online and I like the one by Ree Drummond, but really any recipe will work well. Just remember that you need 10 ounces of salt (by weight) per gallon of water. Salt crystal sizes mean that it will weigh differently so do not just substitute dry measures for weight. Weigh the salt. For a turkey of 15-20 pounds you will need two gallons of brine, and to that you can add additional water if needed to cover the turkey. If you just want to use salt and water, that will work fine too. Bring about half a gallon of water to a boil and add 20 ounces of salt, stir until dissolved and let cool. Refrigerate for tomorrows use. When ready to use, add the remaining water (1 1/2 gallons) and stir to combine. This will result in two gallons of brine.
Make sure you have a large container or a big heavy plastic bag. They now make bags just for turkey brining, so buy one of those if you like. I got mine at Bed, Bath and Beyond. If you are using a large container make sure it fits into your refrigerator. If you are using a cooler, clean it and make sure the garage is cool enough to maintain the temperature below 40F degrees. If not, be prepared to periodically add ice to the water to maintain a safe temperature.
1 day ahead (Wednesday morning, for Thanksgiving Dinner)
Brine the Turkey

As you can see here, I've put a large zip locked plastic bag into my refrigerator's meat drawer, where I previously had my fresh turkey stored. if you bought a frozen turkey, it must be thawed before you brine it. Pour some of your brine into the bottom of the bag or container. Wash the turkey inside and out and place, breast side DOWN into the brine. Set aside the neck, giblets, etc. and refrigerate for later use. Pour on the remainder of the brine and add water to cover. Put the brined turkey into the refrigerator or in a cool place where you can maintain temperature to between 32F - 40F degrees.
 |
| In the meat drawer ready to go in the refrigerator. |
Stuffing/Dressing Prep
I assume you will likely be wanting dressing for dinner with the turkey, as it's certainly traditional. I do not recommend stuffing the turkey, as it will slow cooking and make it cook unevenly, causing dry breast meat. So if you are using fresh bread, you can cube it and prepare the bread the same day as you brine the turkey. I like to use a crusty bread, which could be a French loaf or a Focaccia bread. Cut it into large cubes.

Remove from the oven and let set, uncovered so the bread dries out completely. Drying the bread ensures that it will soak up the broth you will be making to finish the stuffing. You can finish making the dressing now (the day before Thanksgiving), placing it in a baking dish in your refrigerator for tomorrow's service, if you follow a recipe like mine where all ingredients are pre-cooked on the stove top before mixing together. If you are using any raw ingredients then you should make it only the day you will bake/serve. My recipe for classic Chestnut Stuffing is always a hit!
Now, remove two sticks (1/2 pound) of butter from the refrigerator and let it come to room temperature for tomorrow's use.
Serving Day (Thanksgiving Day)
Remove the turkey from the brine and rinse dry about 1 hour before baking. This permits it to warm up slightly. Make sure it is well dried with paper towels on all sides and inside. Most turkeys in the 15-20 pound range will take 2-3 hours to roast. My 11.5 pound turkey took only 1 hr 15 min to roast. See timing on the package for estimates, but remember only temperature should be your guide as to when it comes out of the oven.
While the turkey is coming to temperature roughly chop two carrots, two stalks of celery and a medium onion. Spray the bottom of your roast pan with food release for easy clean up. Add the vegetables and the turkey neck. This will become your gravy base. Add water until the vegetables are about half covered. This will prevent smoking from the drippings as they hit a hot pan. Place a roasting rack into the pan and make sure it is stably seated (i.e., not sitting on vegetables.) Spray the roasting rack with food release to insure the turkey does not stick.

Pre-heat the oven to 425F degrees set to convection roast, if you have this setting (as it provides heat mostly from the top of the oven). If you do not have this setting, set the oven to 450F degrees.
Using 1/4 cup of softened butter (1 stick) mash it with a fork. Add salt, pepper, sage/poultry seasoning or other favorite spices and 1 teaspoon of Dijon mustard. Combine with the softened butter. Using your hands, the back of a spoon or silicon spatula, open up a pocket under the breast and leg skin without tearing the skin. Spread the softened butter mixture under the skin.
Melt the remaining 1/4 cup (1 stick) of butter and paint the turkey with it on all sides. Sprinkle with poultry seasoning, salt and pepper and/or other favorite seasonings. Whatever you use make sure you also do inside the body cavity.
 |
| Breast Side Down |
Tie the legs together with butchers twine, or tuck them into the skin fold or metal clasp they often provide in a dressed turkey. Tuck the wing tips under the bird as shown in the image above, then place the turkey breast side DOWN onto the roasting rack. Place it in the hot oven for 30 minutes.
Remove the turkey from the hot oven and reduce the oven temperature to 325F degrees for convection roast or 350F degrees without convection. Have someone hold the hot roasting pan stable while you turn the turkey over, breast side now up. I like to use silicon oven mitts for this task as they can easily be wiped clean. Careful when handling the roasting pan and the turkey, they will both be quite hot.
Close the oven and roast another 30 minutes and observe the temperature of the turkey. If the temperature is already 150F degrees or higher in the thigh, brush on the glaze (below) if using. If the wings or legs are browning more than you desire, cover them in foil.
Glaze (optional)
3 tablespoons maple syrup
4 tablespoons honey
1 tablespoon Dijon mustard
1/2 teaspoon dried thyme
1/2 cup orange juice, no pulp
1/2 cup balsamic vinegar
1 teaspoon garlic powder
3 tablespoons orange liqueur
Stir together the above ingredients and paint the turkey.
Continue roasting the turkey until the meat thermometer reaches 170F or above at the thigh and 160F at the breast. Paint on more glaze every 10 minutes or so. Remove from the oven and onto a cutting board with drainage channel (to catch juices that run off.) Allow to rest 1 hour before carving.
 |
| Breast side up - ready to brown and crisp. |
Note: If the thigh temperature is not high enough but the breast temperature is getting close to the target temperature of 160F degrees, you can slow the breast meat cooking by dipping 3-4 layers of cheesecloth into white wine and laying the wet cloth over the breasts. This will permit you to continue roasting the turkey without overcooking the breast meat. Overcooked breast meat will be dry.
While the turkey rests, make the gravy by straining the drippings and vegetables and reserving the liquid. Use a gravy separator to remove the fat. Heat the turkey broth/drippings until it just starts to simmer (a few bubbles) and separate 1 cup of the liquid and set aside keeping it hot. Make a slurry of flour and cold water, and stir into the simmering pot to lightly thicken. The remaining hot unthickened broth will be used after the turkey is carved.
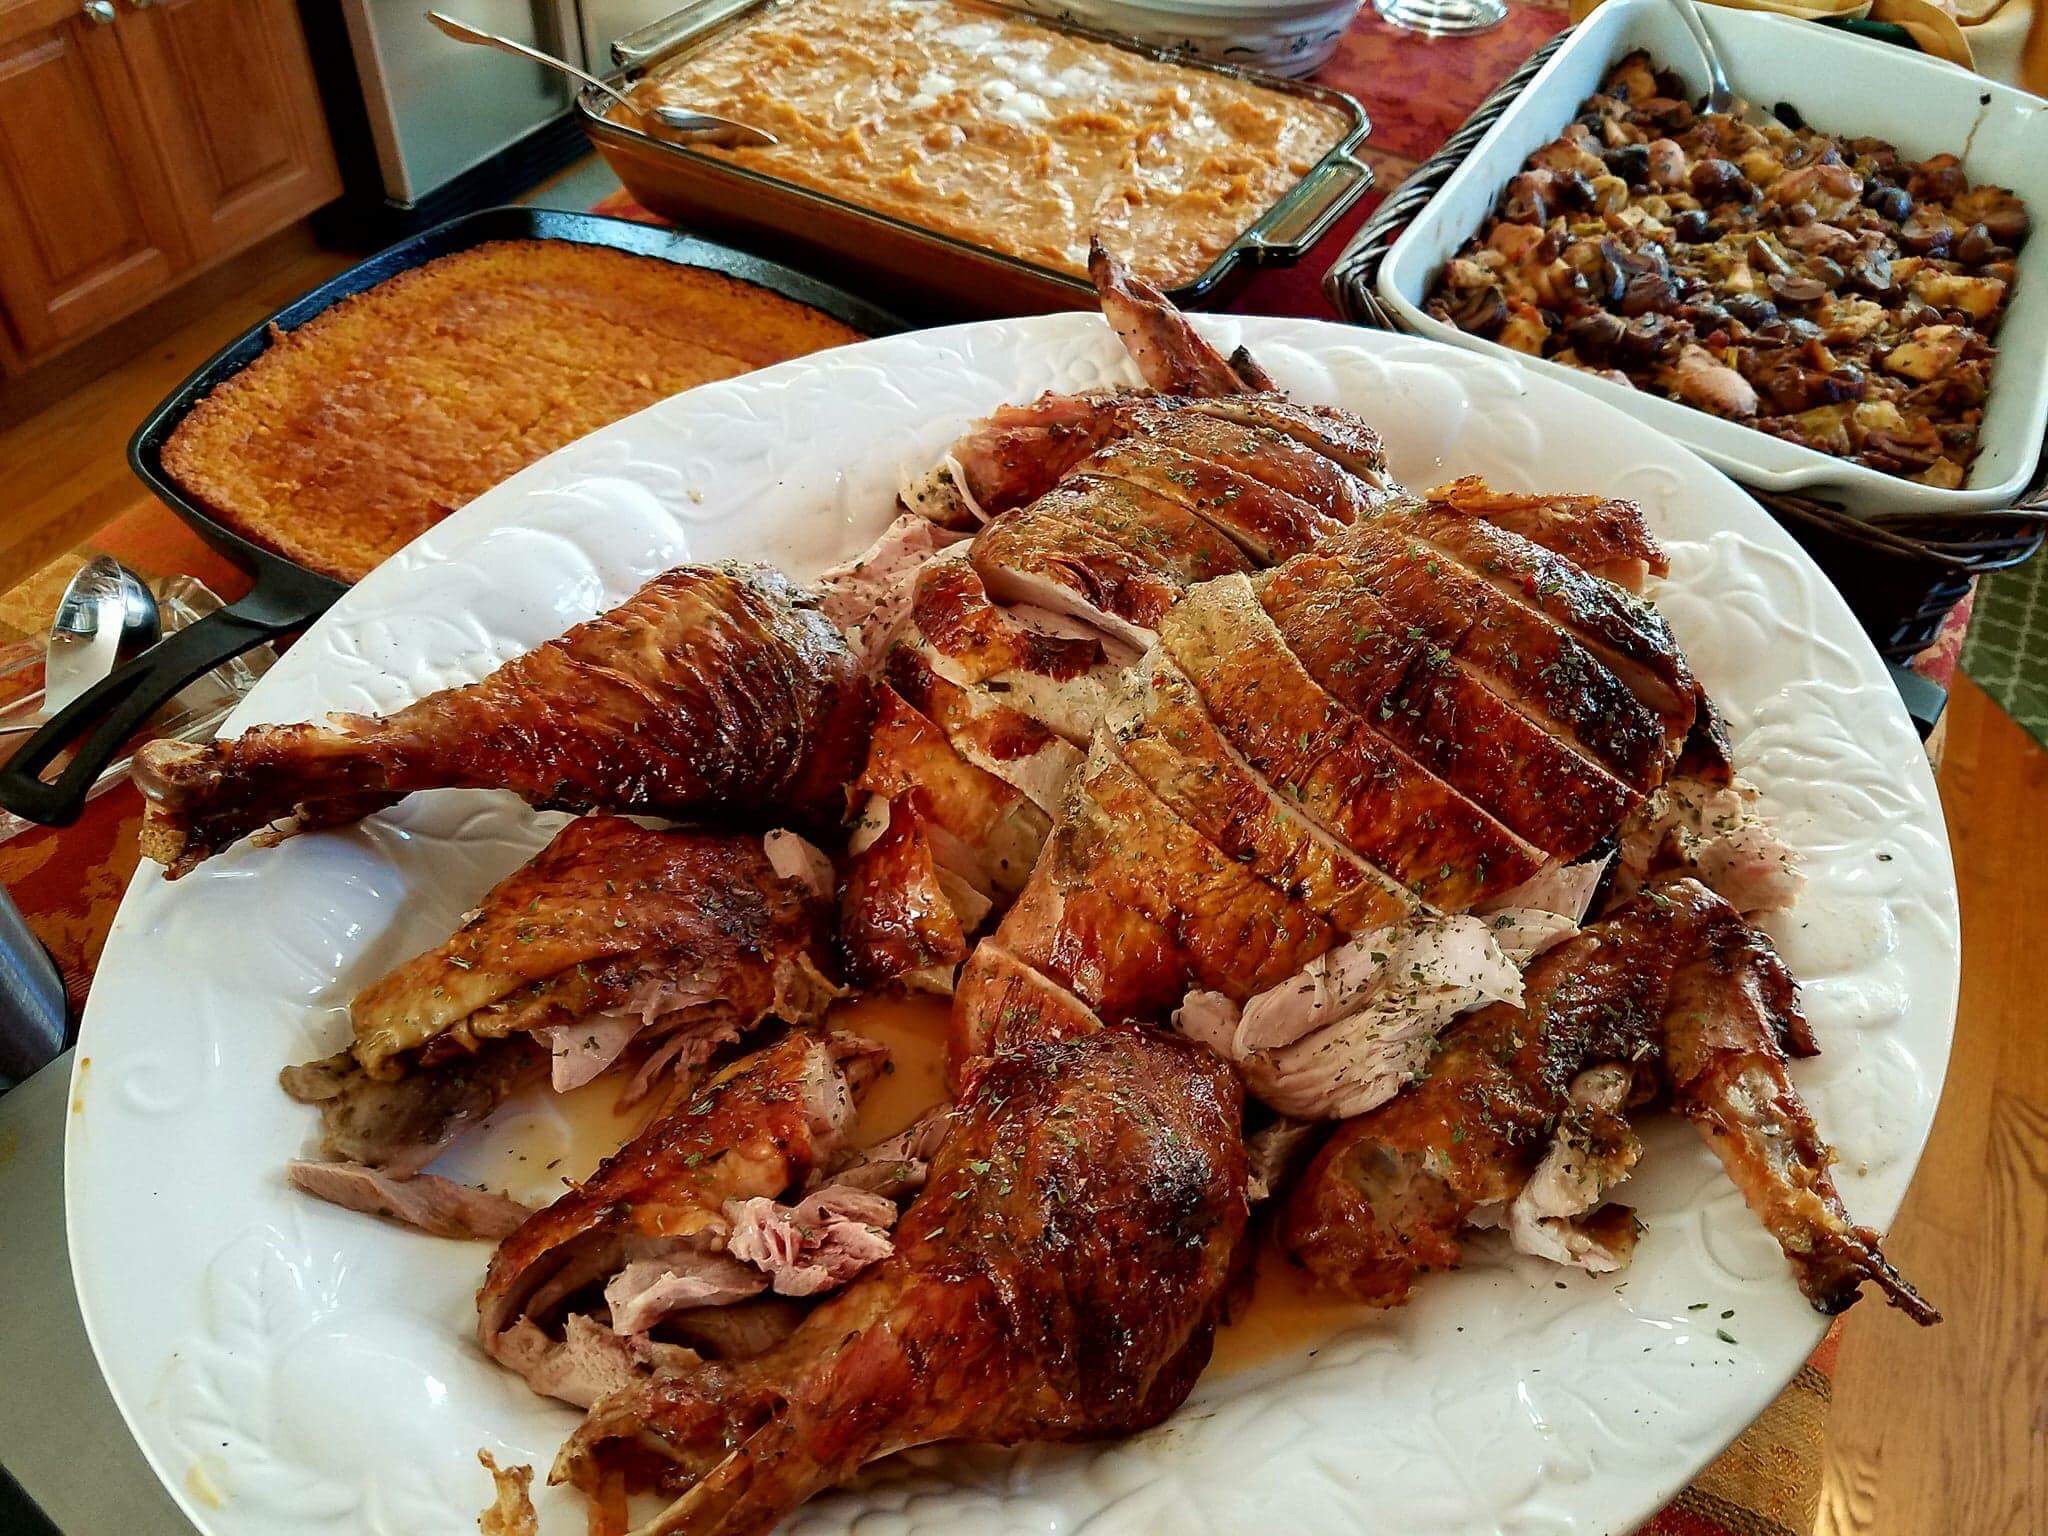 |
| Carved and Ready to Serve |
When ready to serve, carve the turkey as shown above and place on a platter. First, carve off each leg and thigh. Separate the leg and thigh at the joint. Remove the dark meat from the thighs and cut into portions and place on the platter at one end. Place the bone-in leg portions on either side. Next remove the wings. Cut the third portion of the wing (closet to the body of the bird) from the other two segments. Remove the meat from the third portion and place on the platter between the two bone-in wing segments as shown. Make a cut under one of the breasts and another down alongside the breast bone and remove the white meat breast segment in one piece. Cut it crosswise and place it on the platter between the wings and legs. Do the same with the other breast. Cutting the breasts as described will help it remain moist while waiting for service.
Pour the reserved cup of hot turkey broth onto the sliced meat, garnish as desired and serve. The gravy is for use on potatoes and stuffing, and on individual turkey servings. The hot broth will keep the carved turkey on your platter moist and warm. For buffet service, place the turkey platter on a warmer as shown below.
Comments
Post a Comment